PSCAN Troubleshooting Guide
Last updated Thursday, December 30,
2004
Return to GFC Software Product List
This guide is intended to help you resolve problems in transmitting frequency data from the PC (using PSCAN) to the radio.
NOTICE: While effort has been made to ensure the accuracy of this information, by using it YOU accept full responsibility for any damage or injury.
The first priority is making sure that the radio works properly and is capable of receiving data from the computer. We will use Uniden's software (SCAN.EXE) to test this, rather than our PSCAN software. If SCAN.EXE does not work, then we have problems that need to be resolved before we can work on PSCAN.
The steps we will follow are:
- Verify that the radio works
- Verify that proper connections have been made
- Test the radio and cable using Uniden's SCAN.EXE software
- Adjust
PSCAN's settings
- Adjusting for Windows 2000, ME and XP
- Error Messages
- Contact GFC Tech Support
VERIFYING THAT THE RADIO WORKS
Verify the basic operation of the radio. Apply power to the radio. Do the lights light up? Does it scan properly?
- Connections should be made with
both the PC and the radio powered OFF.
(NOTE: We often connect the cable with the PC
power already on rather than go through a lengthy boot-up
cycle on the PC, but this DOES increase the
possibility of a short causing damage when making the
connection.)
- WARNING: The interface cable should be connected ONLY
to the serial port on the PC. Other connectors may look
like a serial port but are not. Connecting to these ports
could damage the PC or the radio. The serial port is
either a DB-9 (9-pin) or DB-25 (25-pin) connector, and
are always "male."
"Female" DB-9 connectors are also used for some video connections, and "female" DB-25 connectors are used for parallel (printer) ports, SCSI ports, etc. Connecting the radio to any of these connectors can damage the radio, the PC, or both!
- You should be using a
"straight-through" RS-232 (serial) cable, NOT
a cable wired as shown in Uniden's documentation. (Their
documentation incorrectly shows a
"cross-over," or "null modem" type of
cable.)
- One end of the cable should be
connected to the DB-9 RS-232 port on the bottom of the
radio. (NOTE: On one revision of the radio, the port
was on a short cable extending from the radio, rather
than inside the radio case itself.)
- The other end of the cable should
be connected directly to the COM1 serial port on the PC. (NOTE: You MUST use COM1, not COM2,
COM3, COM4, etc. This is a limitation of Uniden's
software.) The only adapter that you might need on this
cable will be a 9-to-25-pin adapter if your cable is a
25-pin type and your COM1 port is a 9-pin port, or
vice-versa. Again, do NOT use a null-modem cable
or adapter!
- After making the connections, the
PC should be powered up first. Then power up the radio.
(This is not actually a "requirement," but
represents what we believe to be the safest way to do it
in order to reduce the likelihood of damage to either.)
- It is not necessary to press any buttons on the radio. (When programming manually from the radio's keyboard, you press the PRG button. But when programming from a PC, the radio will be placed into the appropriate mode automatically by the software.) You may adjust the volume or squelch, if desired, to reduce or eliminate noise from the radio while programming it.
TESTING THE RADIO USING SCAN.EXE
- The radio should be connected to
the PC as described above. (Note that only a
"straight-through" cable should be used, and
that is should be connected to COM1; no other COM port
will work.)
- SCAN.EXE is a DOS-based program. It usually runs
fine under Windows 95, 98, 2000 or NT, but if you are
having problems it is best to boot to a DOS
prompt for testing purposes. This will eliminate Windows
as a potential source of problems and allow us to verify
that the radio and interface cables are working
correctly, and that the PC is capable of communicating
with the radio.
Again, it is best to BOOT to a DOS prompt, not just "run" a DOS prompt.
- Use SCAN.EXE to create
a frequency file (or load an already existing one). It is
not necessary to create a complete file
containing entries for all 100 channels. Just create a
basic file with at least a few frequencies that we can
use for testing purposes.
- Use SCAN.EXE to
transmit the file to the radio. Follow the instructions
that came with SCAN.EXE.
- If SCAN.EXE is not
able to transmit the file to the radio, then we
have a problem with one of the following (listed in order
of likelihood):
- connections to the interconnect cable (that is, the wrong port is being used or the port has failed)
- an incorrect adapter on the interconnect cable (such as a null modem adapter used instead of a straight-through adapter)
- the interconnect cable itself (some cables are not "full-pin" cables. That is, they do not have all the pins connected straight through the cable. While these will work for modems and many serial printers, etc., they may not work for this purpose. The cable is the cheapest component in this setup; by all means, try a different cable!)
- damage to the serial connector cable on the radio (for those units that use the external serial connector)
- serial port failure on the radio itself (possibly the port was damaged by a previous attempt to connect it to the wrong port on a PC)
- serial port failure on the PC (the port has been damaged somehow, or has a software or hardware conflict -- such as an IRQ, or interrupt, conflict -- with another port or device)
- a defective copy of SCAN.EXE. If you got it from Uniden, this
is unlikely. If you got it off the internet, it
should be considered "suspect."
Whatever the cause, you will need to resolve this problem before we will be able to get PSCAN to work. We can try to help you track down the problem, but we are limited in what we can do "remotely." Ultimately, YOU must get the equipment working properly on this basic level.
You can also try using a different PC (again, following the instructions and precautions listed above). If you have access to another radio you can test your PC setup with that radio. By all means, try a different cable! We have found that 90% of the communication problems at this level involve the interconnect cable or its connection to the PC.
- If SCAN.EXE is able to transmit the file to the radio, now we can try it using PSCAN. If PSCAN is still unable to transmit the file, then the problem is with PSCAN or its settings.
We have provided a "PSCANSND Configuration" utility to make adjusting PSCAN's settings easier. To use it, just locate the "Fine-tune PSCAN settings" icon in the "MR-8100 Programmer" group. (This was created automatically during the installation of PSCAN on your system.) Double-click on that icon to start the PSCANSND Configuration utility. You will see a screen similar* to the following:
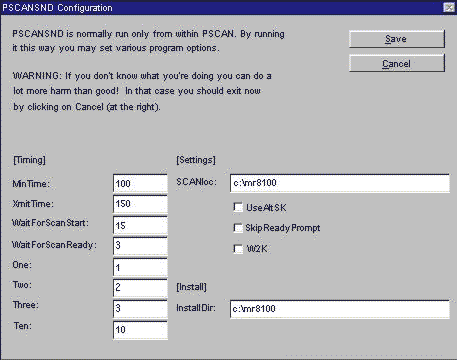
*NOTE: The configuration screen may change from time to time. The above diagram is representative but may not be an exact representation of the current product's screen.
WARNING: If you don't know what you are doing, you can do a lot more harm than good! Change these settings at your own risk!
Here is an explanation of each of the fields:
In the [Timing] column:
| MinTime | The minimum time (in seconds) expected for a data transmission from the PC to the radio. Default: 100 | |
| XmitTime | The maximum time (in seconds) expected for a data transmission from the PC to the radio. Default: 150 | |
| WaitForScanStart | Reserved for future use. | |
| WaitForScanReady | Reserved for future use. | |
| One | A short delay (in seconds). Default: 1 | |
| Two | A somewhat longer delay (in seconds). Default: 2 | |
| Three | A still longer delay (in seconds). Default: 3 | |
| Ten | A very long delay (in seconds). Default: 10 |
In the [Settings] and [Install] column:
| SCANloc | The location of the SCAN.EXE program (from Uniden). Default: Specified by the user during installation. | |
| UseAltSK | Checking this box causes PSCAN to use a different method for triggering the transmission of the programmed frequencies to the radio. This may overcome problems (such as ERROR 907 or ERROR 908) when using Windows 2000, Windows ME or Windows XP. Default: Unchecked. | |
| SkipReadyPrompt | Checking this box causes PSCAN to skip the final prompt before beginning transmission to the radio. Recommended for experienced users only. Default: Unchecked. | |
| W2K | Checking this box causes PSCAN to use a different method for triggering the transmission of the programmed frequencies to the radio. This may overcome problems (such as ERROR 907 or ERROR 908) when using Windows 2000, Windows ME or Windows XP. We suggest you try "UseAltSK" (see above) first! Default: Unchecked. | |
| InstallDir | The directory into which PSCAN was installed. Default: Specified by the user during installation. |
If you are experiencing ERROR 901 ("The SCAN.EXE program was not found in the directory specified in "SCANloc" in the [Settings] section of the PSCAN.INI file. ..."), this means that the SCAN.EXE program does not exist in the directory you specified during installation. To correct this problem, do one of the following:
Move the SCAN.EXE program to the directory you specified. (Displayed above next to "SCANloc".)
Change the entry in the "SCANloc" field to reflect the actual location of the SCAN.EXE program.
If you are experiencing ERROR 905 ("Improper or missing configuration information in PSCAN.INI file! ..."), this means that the SCAN.EXE program does not exist in the directory you specified during installation. To correct this problem, do one of the following:
Move the SCAN.EXE program to the directory you specified. (Displayed above next to "SCANloc".)
Change the entry in the "SCANloc" field to reflect the actual location of the SCAN.EXE program.
If you are experiencing ERROR 907 ("File did not load correctly!"), this means that for some reason, PSCAN was unable to load the temporary frequency file to be transferred into the MR-8100. This could be caused by a damaged file (unlikely), or by a timing problem between MR-8100 Programmer Sender (PSCANSND) and Windows on your particular system. Refer to the [Settings] column, above, paying particular attention to the UseAltSK and W2K settings. Contact GFC Software Technical Support for further assistance, if needed.
If you are experiencing ERROR 908 ("Transmission error! Transmission timed out!"), this means that PSCANSND has determined that the data transfer is taking longer than expected. (Normal time is between 90 and 150 seconds.) This might be normal on some slower systems, or systems with older serial ports unable to transfer data efficiently. If necessary, you can adjust this time by changing the entries in the "MinTime" and "XmitTime" fields, for minimum and maximum transmission times, respectively. The value is the time in seconds; the defaults are 100 and 150.
If you are experiencing ERROR 1009 ("1009: File copy..."), this means that PSCANSND was unable to locate the SCAN.EXE program (from Uniden) in the directory you specified during installation of PSCAN. The easiest way to correct this problem is to manually copy the SCAN.EXE program into the directory in which you installed PSCAN, then change the "SCANloc" setting to match the "InstallDir" setting. Contact GFC Software Technical Support for further assistance, if needed.
NEW INFORMATION IS BEING
ADDED TO THIS SECTION REGULARLY.
PLEASE CHECK BACK LATER . . .
If you are still experiencing problems with PSCAN after going through the above steps, you may contact GFC Software Tech Support for further assistance. Please be prepared to provide the following information:
- The version of PSCAN you are using.
(Please be sure to obtain the current version of PSCAN before calling for
assistance. The problem you are experiencing may
have been corrected in the latest version!)
- The version of Windows you are using. This could be
Windows 3.x, 95, 98, 2000, NT 3.5, NT 4.0, etc.
- The following information about your computer:
- processor type (386, 486, Pentium, Pentium II, Pentium III, AMD, etc.)
- processor speed (in MHz)
- amount of RAM memory (in MB)
- installation location for PSCAN (usually C:\MR8100)
- list of other programs running (active or "background")
- The contents of your PSCAN.INI file (contained in your Windows
directory, usually C:\WINDOWS).
- Your registration name and
registration number (contained in the PSCAN.INI file).
- A complete description of the problem you are having.
If you are having trouble with a specific frequency file, we may ask you to email a copy of that file to us for examination. Information in such files will be used only to assist you in resolving problems with PSCAN. Likewise, we may ask you to email a copy of your PSCAN.INI file to us for examination.
! Please keep in mind that PSCAN is the product we have sold you. Although we may occasionally offer cables, frequency files or lists, etc., and we may attempt to offer recommendations for resolving problems that are related to hardware or non-GFC software, we normally cannot provide support for anything outside of PSCAN. It is simply impossible for us to provide support for Windows software, PC hardware, radio hardware, etc., from a remote location. On some rare occasions we may, at our discretion, offer to examine and test your equipment -- radio, cables, PC hardware, etc. -- if you ship them to us. YOU must assume all risks and shipping costs, and must have permission from us prior to doing so. (Any items sent to us without prior arrangements having been made become our property and will be disposed of as we see fit.)
| Created 10-24-00 | © 2000-2004 GFC Software. All Rights Reserved. | Last updated 12-30-04 |
| No part of this document may be copied or reproduced in any form without the express written consent of GFC Software. | ||